Vicious the Hondian
Home of Vicious the Hondian (Vicious Cycle)

Hey all! I am Gonzo and I'm back on the www. Some of you may recall Vicious Cycle (its never finished) turned into Vicious the Hondian from the HondaShadow.Net forum. I basically built this bike while tracking progress on the old forum back in 2004. As the mantra goes, "Its never finished, its a Vicious Cycle!" This past year I finally removed the stock "Buckhorm" bars that I liked so much in lieu of some 1.5" thick, 12" mini apes. I kept the old HD style switch boxes with radio controls. It really is more comfortable to ride sitting up.

This past year I also decided to go back through the Mikuni TM40 side draft carb and really dial it in. I have been running it since 04 with an all Go or No Go when cracking it open. I know more now that I did then and took my time with the jetting. She now has a nice steady pull and roll on the throttle. No more full thrust/no thrust! I will be adding some of the old projects I did to her back on here as I go. For now, here are some photos of her from Flippin Arkansas.


The Fenders
This is where it started in Plano TX 2004. In 2003, Indian shut down again and flogged off a bunch of parts on eBay. I picked up the 6 piece fender kit and set out to figure out a way to get them on my Shadow. It snowballed from there. Not wanting to chop up the rear fender to make way for the outboard shocks, I beefed up the swingarm and added a Goldwing Mono-shock mounted to the front cross bar, welded mounts to the frame under the seat for the top mount. That meant the air box had to go.


Anyone who has cut open their airbox for more flow knows that the stock carbs will not run past intermediate jet due to lack of vacuum. SO I built an intake manifold out of black iron pipe from Lowes and hung the Mikuni TM40 side draft carb on the right side! Fired right up and idled.

Next was searching for the perfect taillights. Searching eBay for 1930s taillights, 40s taillights and 50s taillights brought me to the 1959 Cadillac lights before they were gauche and mainstream. I wanted them mounted with flare, Autozone flared exhaust tubing fit the bill. Many hours were spent on the bench grinding to get two tubes outboard of the Chief fender just right. Instead of adding the lower two I added a third in the "V for Vicious" configuration.


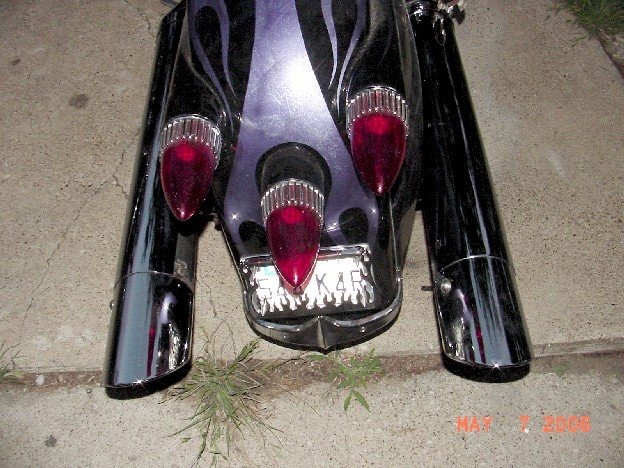
The front fender needed something to take up the extra space, so Honda Aero trim pieces fit the bill.

The Seat
Forks and wheels got chromed at Atlas Plating in Houston Texas, I built a seat pan for the first time that was formed like an old tractor seat and was comfortable to sit on before the padding was added. The leatherwork was done by a renowned saddle and boot maker in Ft Worth whom I had met on the Valkyrie forums when I had my Valk. Haven't talked to him in years and his name escapes me (Carmen?). Great work, though today, its about time for a new cover. The tool work provides thin spots to rip open which started the last 6 months. Besides, its faded to more of a blue than purple.


The Tank
Fat fenders need a fat tank. Thats the new theme here. Everything has to be overboard big. I nabbed a Valkyrie tank and cut the bottom off of it leaving the seam on the top shell.

Then I bought a bashed up Shadow tank (mine was good enough to sell), and cut the top off of it leaving the seam on the bottom. Fit right together leaving a gap at the front to patch in!

Then I bought a bashed up Shadow tank (mine was good enough to sell), and cut the top off of it leaving the seam on the bottom. Fit right together leaving a gap at the front to patch in!

While I had it open, it was a great time to wire brush the insides. I was planning on POR-15 treatment once welded together to ensure a good seal. I didn't have a TIG so welded it with my Miller 210 MIG welder. Once welded up I filled it with water to test ity, drained, welded and ground down the leaks and repeated twice. Then the POR-15 sealed it all oin. Its now 2020 and still holding strong.


The Paint
Then the paint was needed after all fitment was complete. Enter MaxxMuscle Cycle Painting in Knoxville TN who was running a special on eBay. He had this purple paint from a car he had painted already. I had him marblize the flames on black base. I am happy with it though again, the age and dings take their toll. Heres a shot of the day I rolled it out of the garage, March 16 2006, Stage 1 we'll call it.

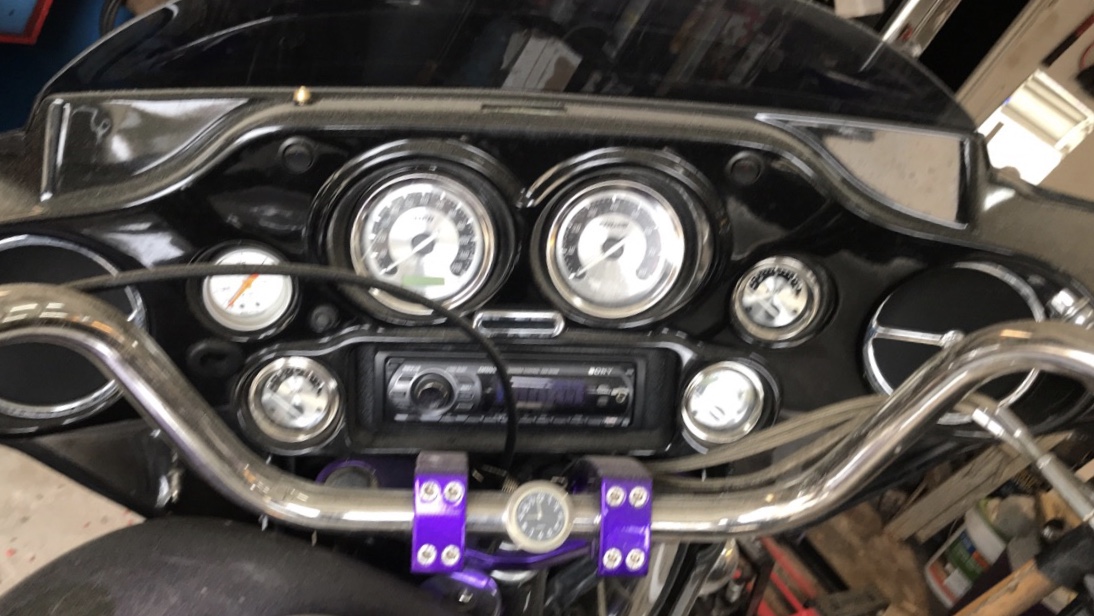
Batwing
The Batwing was added a few years later with HD gauges. That was a fun project. 97 and up HD Speedos ran off of a serial data bus from the computer. I had to pick up an HD computer to tell my speedo how fast I was going. I used a pick up sensor on the front rotor bolts, fed that into a Speedo-Healer to increase the pulse rate, and fed that into the computer. It was an electronics project and it works.
The Cans
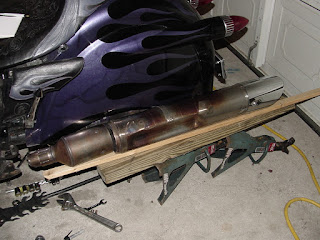
Big Fenders, Big Tank, big fairing, this big needs big dual pipes. Using extra sets of head pipes I cut the corners and rewelded the rear pipe down under the swingarm and across to the left side.

I used two VTX-C (2 into 1) mufflers, cutting the end off the left side and rotating it up and rewelding straight. The first set I had hollowed out, I opted for a new set a few years later....sounds better.

I used two VTX-C (2 into 1) mufflers, cutting the end off the left side and rotating it up and rewelding straight. The first set I had hollowed out, I opted for a new set a few years later....sounds better.


Glad your back, Gonzo!
ReplyDelete